Chapter Ten
Showers and Tubs
Part Two: Faucets and Fixtures
By the editors of this book. Sources checked November 2, 2026.
Shower valve replacement usually means one of two jobs: swapping the cartridge and trim, which many homeowners can do, or replacing the valve body inside the wall, which belongs to a licensed plumber. Most dripping showers need only the first. The rest of this chapter sorts those out, along with the easier work on showerheads and tub spouts.
10.1 How is a shower put together?
Three visible parts sit on top of a hidden one. The showerhead, the handle and the tub spout are all out in the room, and most of them can be changed with hand tools. Behind the wall is the valve body, a brass fitting connected to the hot and cold lines, and the piping that sends water up to the head or down to the spout.
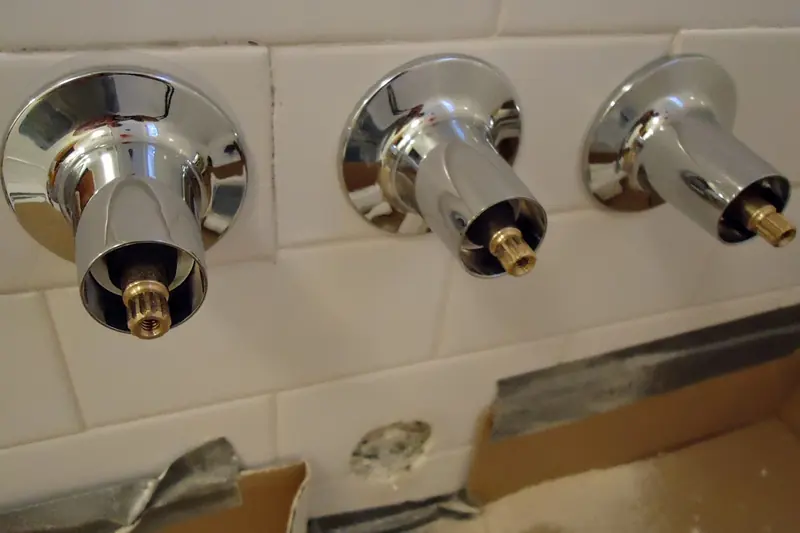
Figure 10.1 shows what you see once the handle is off. The face plate and handle are the trim. The part sticking out is the end of the cartridge, or on an older shower, the stem. This is the same idea as the cartridge in Chapter 8, only larger and harder to reach.
10.2 Why does a shower drip?
A showerhead that drips after the handle is closed nearly always has a worn cartridge or washer in the valve. A drip like that is worth fixing, since EPA puts a showerhead at 10 drips per minute at more than 500 gallons a year.1
A leak where the head meets the arm is different, and easier. EPA notes that some leaky showerheads can be fixed by making a tight connection to the pipe stem, using pipe tape, also called teflon tape.1 It takes five minutes. If the water seems to be coming out from under the tile or down inside a wall, stop looking at the head and read Chapter 28.
10.3 How do you replace a showerhead?
This is the gentlest job in the bathroom, and about as hard as changing a light bulb. It helps to know the numbers before you buy. Standard showerheads use 2.5 gallons per minute, and WaterSense labeled ones use no more than 2.0.2 EPA estimates the average family could save 2,700 gallons a year with one.2
- Unscrew the old head from the arm, by hand if you can, or with a wrench on a rag.
- Hold the arm steady with your other hand so it does not twist inside the wall.
- Clean the threads, and wrap them with two or three turns of pipe tape, clockwise.
- Thread on the new head, hand-tight, and then a small snug if it drips.
If the flow seems poor afterward, take the head off and see whether a small flow insert or screen has trapped grit. The same advice applies as in Chapter 9.
10.4 How do you replace a shower cartridge?
Close the main shutoff first. Many showers have no stops of their own, and Chapter 6 shows where the main is. A few newer valves have small stops built into the body, and you will see two slotted screws behind the trim if yours does.
- Close the main shutoff and the water heater valve, then open hot and cold at the shower and at a low faucet until the flow stops. If the tank may have drained on an electric heater, switch its breaker off now and leave it off until the tank is full and a hot tap runs without air.
- Cover the tub or shower drain so nothing falls in.
- Remove the handle screw and pull off the handle, then remove the trim plate.
- Photograph what you see, then take out the retaining clip or nut.
- Keep your face clear and pull the cartridge straight out, using a puller made for that model if it is stuck.
- Match the new one to the old by maker and model, and seat it the same way.
- Refit the clip, trim and handle, reopen the main slowly, and test for leaks.
- Set the handle stop if your valve has one, then check the temperature.
Stop if the cartridge does not move. Prying and twisting on a stuck one is how a joint breaks behind the wall, and then a small repair becomes a large one.
10.5 What about scalds?
Many modern shower valves balance pressure or temperature, so that a flushed toilet down the hall does not send a sudden surge of hot water down your back. Many also have a stop that limits how far the handle can turn toward hot. Changing a cartridge can change that setting, so test it afterward.
Run the shower for two minutes at full hot, and hold a candy or meat thermometer in the stream, keeping your hand and arm out of the water. The book's recommendation for the water heater itself is 120°F, as the CPSC and DOE both advise, and Chapter 23 gives the reasons.3 4 CPSC says most adults will suffer a third-degree burn at 130°F in 30 seconds, and at 150°F in 2 seconds, and that most tap water scald injuries and deaths involve the elderly and children under five.3 If the shower runs much hotter than the kitchen, or swings when someone else draws water, find out why and tell a plumber what you measured.
10.6 When does the valve itself need replacing?
You replace a valve body when it is corroded, when no cartridges can be found, or when you want to add anti-scald protection to an older shower. That means opening the wall, usually from behind in a closet if you are lucky, and then soldering or crimping new connections to hot and cold pipes in a tight space. Done wrong, it leaks into a wall where you will not see it for a year.
That is licensed work in this book, and your town may want a permit. Ask your building department, and see Chapter 38. A plumber can also advise whether a new valve will line up with the existing tile and trim, since that is often what decides the cost.
10.7 Tub spouts and drains
A tub spout that drips while the shower runs may have a worn diverter, the small gate or knob that sends water upward. A spout slips off or unscrews, depending on type, so look underneath for a small set screw before you twist. If there is none, it is threaded, so grip it and turn counterclockwise, or wrap it with a towel.
Slow tub drains are usually hair, and they belong in Chapter 16. If you have water seeping under a tub, check the seals around the drain and overflow, and also the caulk. A leak below a tub often turns out to be something simple on its way to doing a lot of damage.
Where the line falls
- Yours to do
- Showerheads, arms and tape; cartridges and handle stops; tub spouts and diverters; caulk; testing the temperature at the shower
- For a licensed pro
- Replacing a valve body in the wall; adding pressure balancing to an old shower; leaks behind tile; rerouting shower piping