Chapter Eight
Faucets and Why They Drip
Part Two: Faucets and Fixtures
By the editors of this book. Sources checked November 2, 2026.
To fix a dripping faucet, close the stops under the sink, take off the handle, and replace the worn part inside, which is usually a washer, a set of O-rings or a cartridge. Most repairs take under an hour and need only a screwdriver, a hex key and a wrench. The hard part is getting the right replacement, and for that you carry the old one to the store.
8.1 Why bother with a small drip?
Because it adds up, and it does not stop on its own. EPA figures a faucet dripping once a second wastes more than 3,000 gallons a year.1 If it is the hot side, you are also paying to heat what goes down the drain. EPA says old and worn washers and gaskets frequently cause faucet leaks, and those are cheap parts.1
Several faucets starting to leak in the same month can point to high pressure. If that is your house, read Chapter 7 and test before you buy parts.
8.2 What kind of faucet do you have?
There are four common kinds. You can usually tell from the handle, and you will know for sure when it is off.
| Type | How it feels | What usually wears |
|---|---|---|
| Compression | Two handles that tighten down and need some force at the end | Rubber seat washer |
| Cartridge | One or two handles, smooth motion | Cartridge and O-rings |
| Ball | One handle on a rounded cap, moves in all directions | Seats, springs and O-rings |
| Ceramic disc | One handle, a wide cylinder inside, very smooth | Seals, seldom the disc |
Most faucets made in recent decades are cartridge or ceramic disc. Figure 8.1 shows the single-handle version. Lifting the Handle moves the Cartridge, which lines up openings for Hot and Cold and sends the mix to the Spout and out through the Aerator. O-rings seal the moving part against the body of the faucet.
The place where water escapes tells you which part has gone. A drip from the Spout generally means a worn cartridge, washer or seat. Water around the base of the Spout or under the Handle generally means O-rings.
8.3 How do you replace a cartridge?
The steps here are for a single-handle cartridge faucet, the most common kind. Others vary in detail, so keep any maker's sheet that came with yours. Compression faucets come apart in much the same order, with a screw-in stem and a small washer in place of the cartridge.
- Close both stops under the sink, then open the faucet to drain it and to confirm the water is off.
- Put the sink stopper in place, and lay a towel in the basin so a dropped screw has nowhere to go.
- Pry off the small cap on the handle, if there is one, and remove the screw beneath it.
- Lift off the handle, and set out the parts in order on the towel.
- Unscrew the retaining nut or pull out the small clip that holds the cartridge.
- Note which way the cartridge faces, then pull it straight up, using pliers on the stem if needed.
- Take the old cartridge to the store and match it, or find the maker's part by model.
- Seat the new one the same way, and replace the clip or nut.
- Refit the handle, unscrew the aerator, open the stops slowly, and run the faucet for a minute to clear grit, then put the aerator back.
Lay everything out as in Figure 8.2. A phone photo of each stage costs nothing, and it is good to have one when you reach step 8 and cannot recall which way it went.
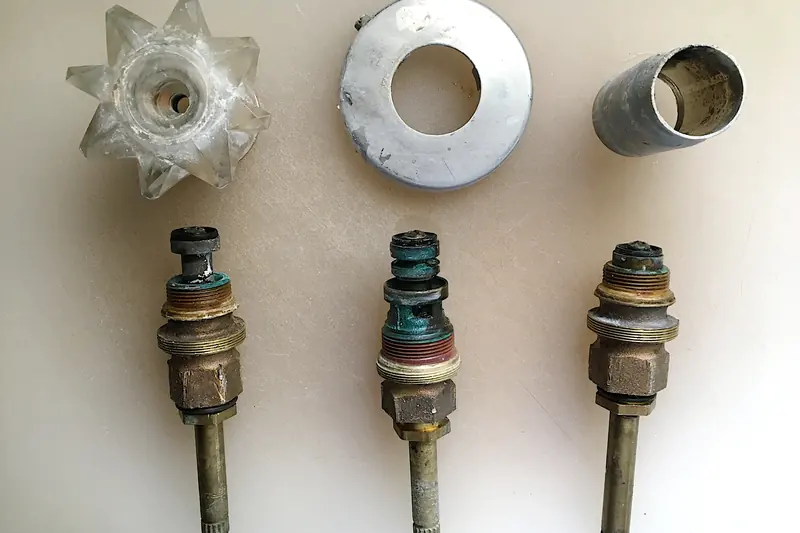
If hot and cold come out reversed afterward, the cartridge is turned. Most can be rotated 180 degrees to set that right. Close the stops and try again. If the water runs weakly after the job, the likely cause is grit in the aerator, and Chapter 9 shows you how to clear it.
8.4 Where do you find parts?
Cartridges look similar and fit only their own make and model. Check the handle, spout or the deck plate for a maker's name, and if there is no name, bring the old part. Faucet parts are also listed at PlumbingSupplyAndMore's faucet parts section (PlumbingSupplyAndMore has the same owners as this book), one place to look and not necessarily the best. Many makers also sell parts directly, and a warranty may cover them, so it is worth asking.
8.5 When should you replace the whole faucet?
Replace it when the body is corroded, when the parts cannot be found, or when you are on your third repair. Swapping a faucet is a homeowner job, if an awkward one, since you will be working on your back with a basin wrench. Ask at the store about a new pair of braided connectors while you are at it, and check that your stops close fully, as in Chapter 6.
Age is another reason, for a drinking-water tap. CDC notes that household fixtures, solder and fittings made before 1986 may contain lead, and EPA lists brass or chrome-plated brass faucets among possible sources.2 3 An old faucet does not necessarily mean a lead problem, and testing is the only way to confirm one.5 Chapter 33 takes you through it.
A new bathroom faucet is also your chance at saving water, because a WaterSense model uses a maximum of 1.5 gallons per minute against the 2.2 standard.4
8.6 What should you leave alone?
Faucets are forgiving, but a few things are not yours. If a stop will not close and the main is the only way to isolate the faucet, plan to fix that first. If the leak is coming out of the wall behind the faucet, or a supply pipe rather than a connector, you have moved past the faucet, so stop and call a plumber. Shower valves look like faucets but live inside the wall, and they get their own treatment in Chapter 10.
Where the line falls
- Yours to do
- Replacing washers, O-rings and cartridges; swapping a complete faucet and its connectors; matching parts; clearing grit after a repair
- For a licensed pro
- Leaks inside the wall; a faucet that needs new supply pipe; stuck stops you cannot close; moving a faucet to a new location
Notes
- U.S. EPA WaterSense, "Fix a Leak Week." epa.gov ↩
- U.S. Centers for Disease Control and Prevention, "Lead in Drinking Water." cdc.gov ↩
- U.S. EPA, "Protect Your Family from Sources of Lead." epa.gov ↩
- U.S. EPA WaterSense, "Bathroom Faucets." epa.gov ↩
- U.S. EPA, "Protect Your Tap: A Quick Check for Lead." epa.gov ↩