Chapter Fifteen
Wobbles and Wax Rings
By the editors of this book. Sources checked November 2, 2026.
Wax ring replacement means lifting the toilet off its flange, scraping away the old wax, and setting the bowl down once on a new ring. It is a messy job, but not a difficult one. It is the fix for water seeping around the base, and for a drain smell in the bathroom that has no other explanation. A toilet that only rocks may not need it at all, provided you act before the seal breaks.
15.1 What does the ring actually do?
A floor-mounted toilet sits on a flange, a collar fixed to the floor around the drain pipe. The wax ring is squashed between the horn under the bowl and that flange. It does two jobs at once: it keeps water in and drain air out. Fluidmaster describes its reinforced ring as forming a gas-tight, odor-tight and watertight seal.1
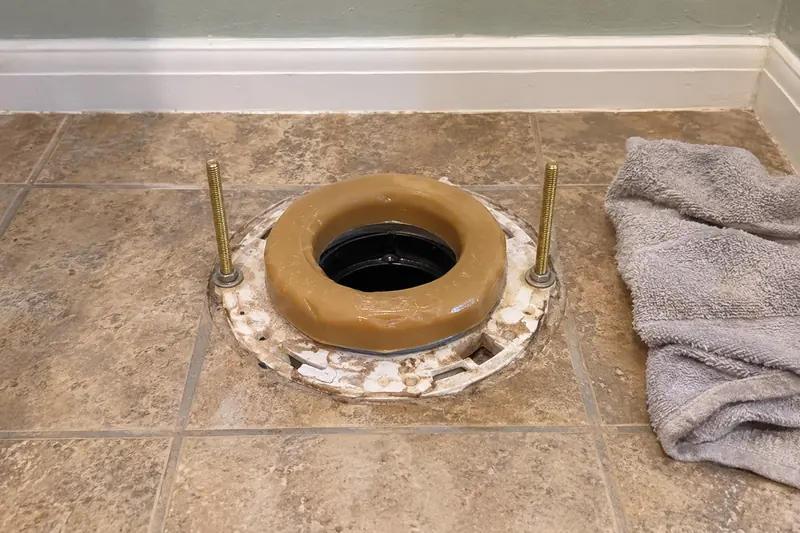
Wax has no spring in it. Once it is squashed, it stays squashed, and if the toilet moves it does not recover. That is why a wobble and a leak so often go together. It is also why the instructions we read call for a new ring when a bowl is set. Figure 15.1 shows the ring on its flange.
15.2 Can you stop a wobble without lifting the toilet?
Often, if the base is dry. Start with the two nuts under the caps on each side of the base. If they are loose, tighten them a little at a time, side by side. Stop as soon as the movement stops. TOTO's manual warns that over-tightening can damage the china bowl, and Fluidmaster's says to tighten carefully to prevent breaking it.1 2
If the nuts are snug and the toilet still rocks, the floor is the problem. TOTO notes that rocking may occur depending on the condition of the flooring and says to use shims to stop it.2 Slide plastic shims into the gaps until the bowl sits still, then snap off what shows. Do this soon. Every rock works the wax, and a seal that has already been broken will not be repaired by shims.
15.3 How do you know the seal has failed?
Look for water at the base that returns after you wipe it up, especially just after a flush. Stains on the floor and a soft spot next to the toilet are stronger evidence. A drain smell with no dry trap to explain it, as covered in Chapter 19, can be the same fault.
Rule out the easy causes first. Condensation on a cold tank can drip onto the floor in humid weather, and a supply connection or tank bolt can run water down to the base. Dry everything, lay a sheet of tissue along the base, and flush a few times to see where it wets first.
15.4 Replacing the ring
Plan for a free afternoon. Buy the ring before you start. Have gloves, a putty knife, a bucket, a sponge, old towels, a rag and new flange bolts ready. A toilet is awkward and heavy, so have a second person if you can. The steps below follow the sequence given in TOTO's and Fluidmaster's instructions, with the removal added.1 2
- Close the fixture stop, as shown in Chapter 6, and flush with the handle held down.
- Sponge the remaining water out of the tank and the bowl.
- Disconnect the supply line under the tank.
- Pop off the bolt caps and undo the nuts at the base.
- Rock the bowl gently to break the old seal, then lift it straight up.
- Set it on old towels or cardboard.
- Stuff a rag in the drain opening, with a corner showing so that it cannot be forgotten. This blocks drain air and catches dropped tools.
- Scrape the old wax off the flange and the horn. Bag it for the trash.
- Look hard at the flange, then fit new bolts in its slots with the threads facing up.
- Pull the rag out.
- Turn the toilet over onto padding and press the new ring onto the recess around the horn.
- Lower the toilet straight down over the bolts.
- Press firmly on both sides of the rim, or use your body weight, to squash the wax.
- Thread on the washers and nuts and tighten evenly until the bowl is snug.
- Reconnect the supply line, open the stop, and flush several times while watching the base.
Two details decide whether this works. The first is temperature. Fluidmaster says the wax should be at least 70°F for it to flow properly, so a ring from a cold garage should warm up first.1 The second is that you get one try. TOTO's caution is direct: do not move the bowl after the ring is set.2 If you have to lift it again, scrape it and use another ring. Buying two is cheap insurance.
15.5 What if the flange is damaged?
Chapter 12 treats the bowl as the interesting part, but this is where the toilet is actually fastened to the house. A sound flange is firm, level, and fixed to the floor. Look for slots that have torn through, a cracked ring, or rust that has eaten the metal away. Press on the floor around it, too. A soft subfloor means the leak has been going on for a while.
Flanges come in several materials and sizes, and repair pieces exist for common damage. Flange parts are listed at PlumbingSupplyAndMore's toilet flange section (PlumbingSupplyAndMore has the same owners as this book), which is one place to look and not the only one. Match what you already have, and if you are not sure what that is, a plumber can tell you in a few minutes.
A flange that sits well below the finished floor, after a new tile job for instance, is a known trouble spot. Ask about the options before you stack up wax. Whether any of this needs a permit depends on your town, and Chapter 38 says how to find out.
Where the line falls
- Yours to do
- Snugging the base nuts; shimming a rocking bowl; lifting a toilet and changing the ring; replacing flange bolts
- For a licensed pro
- A broken or corroded flange you cannot match; a flange set well below the floor; rotted subfloor; any work on the drain pipe under the flange
Notes
- Fluidmaster, "7511 Wax Ring Kit with Flange Installation Instructions." fluidmaster.com ↩
- TOTO, "Installation Manual, CST775, CST776, CST785, CST786." totousa.com ↩