Chapter Thirteen
The Toilet That Keeps Running
By the editors of this book. Sources checked November 2, 2026.
A toilet keeps running because water is leaving the tank past a worn flapper, or because the fill valve is not shutting off. Those two parts account for nearly all of it, and a homeowner can change either one with a sponge and a pair of pliers. The only skill is finding out which one you have, and that takes ten minutes and some food coloring.
13.1 Why bother over a small trickle?
Because a small trickle never stops. EPA puts the average household's leaks at more than 9,300 gallons a year, and 9 percent of homes have leaks wasting 50 gallons or more every day.1 It names worn toilet flappers among the most common culprits, and says an old flapper can make a toilet flush on its own or leak thousands of gallons a year without a sound.1
So the toilet you can hear is only part of it. Test all of them, including the one in the basement. Chapter 28 goes on to the rest of the house.
13.2 Is it the flapper or the fill valve?
Take the lid off and look at the water level, then run the two tests below. Do them in this order.
- Look at the overflow tube. If water is running into the top of it, the level is too high or the fill valve is not shutting.
- If the water is below the top of the overflow tube, put a few drops of food coloring in the tank.
- Wait, without flushing, for 10 minutes.
- Look in the bowl. Color in the bowl means the tank is leaking into it.1
- Flush to clear the color.
A toilet that starts refilling by itself every so often is the same fault heard from the other end. Fluidmaster's troubleshooting note says it plainly: a fill valve turning on and off by itself means the tank is losing water and the valve is replacing it. Its advice is to clean the flapper and its seat first, and change the flapper or flush valve if the leak continues.2
13.3 Changing a flapper
Figure 13.1 shows the part. Before you buy one, feel the old one. A slick, warped or crumbling flapper is plainly done, and if the seat under it is gritty, wiping it may be all the job needs. EPA's tip is to take the old flapper, or a picture of it, to the store, because width varies and some have a foam float.1
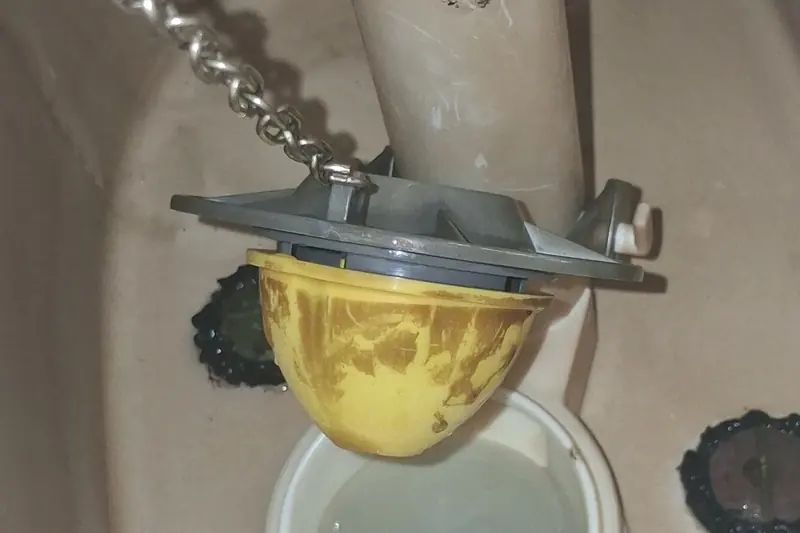
- Close the fixture stop on the supply line, turning clockwise. Chapter 6 shows where it is.
- Flush, and hold the handle down to drain the tank.
- Unhook the chain from the handle arm.
- Slide the old flapper's ears or ring off the posts at the base of the overflow tube.
- Wipe the seat of the flush valve with a rag until it is smooth.
- Fit the new flapper the same way the old one sat.
- Hook the chain so it has about 1/2 inch of slack.2
- Open the stop, let the tank fill, and flush twice to watch it seat.
The slack matters more than people expect. With too little, the chain holds the flapper open a hair and the toilet leaks. With too much, the chain can drop under the flapper and hold it open.
13.4 Changing a fill valve
If the valve hisses without stopping, or the tank will not fill at all, debris may be the cause. Fluidmaster suggests checking under the top cap for debris before replacing anything, and looking for a partial blockage at the stop or the supply line if flow is weak.2 If it is simply old, change it. Figure 13.2 shows a new one in place. These steps follow Fluidmaster's sheet for one common model, so read the sheet that comes with yours.2
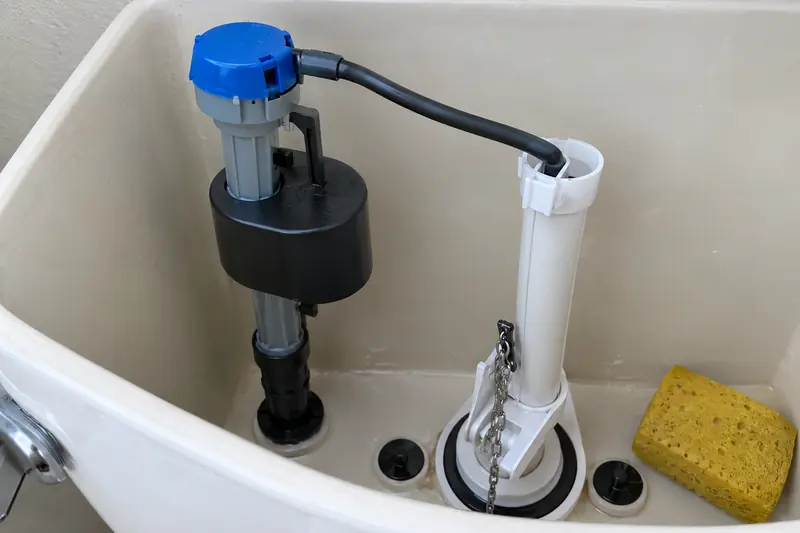
- Mark the current water level on the tank wall with a pencil.
- Close the fixture stop, flush, and sponge out the water that remains.
- Hold a towel under the connection and undo the supply line nut under the tank.
- Undo the locknut and lift the old fill valve out.
- Set the height of the new valve in the tank before installing it, following its sheet.
- Put the shank washer on, set the valve in the hole, press down from inside, and tighten the locknut by hand.
- Clip the refill tube to the overflow tube so it runs into the top with a slight arch.
- Reconnect the supply line, and look at the connector while it is off. Replace it if it looks worn.
- Open the stop slowly and check under the tank for drips.
- Set the float so the water stops about 1/2 inch below the top of the overflow tube.
Three warnings from that sheet are worth repeating. Hand-tighten only, because over-tightening may crack the valve or tank. Do not shove the refill tube down the overflow tube, which may waste a lot of water. And keep the valve's C.L. mark 1 inch above the top of the overflow tube, which Fluidmaster gives as a Universal Plumbing Code requirement that helps protect your drinking water.2 Your town's code may have its own wording, but there is no reason to set it lower.
Replacement flappers and fill valves are stocked at PlumbingSupplyAndMore's toilet parts section (PlumbingSupplyAndMore has the same owners as this book). It is one place to look, not the only one and not necessarily the best.
13.5 What if it still runs?
Test with the food coloring again. If color still reaches the bowl with a new flapper, the seat of the flush valve may be pitted, or the tank may be leaking somewhere you cannot see. Replacing a flush valve means separating the tank from the bowl. It is within reach for a careful person, but there is china to crack and a tank to lift, so many owners stop there.
If water is running on the floor, not into the bowl, close the stop and read Chapter 12 again to see which part is above the leak. A wet floor around the base belongs to Chapter 15.
Where the line falls
- Yours to do
- Food-coloring test; cleaning a flapper seat; changing a flapper or fill valve; setting the water level and chain slack
- For a licensed pro
- A cracked tank; a flush valve or tank-to-bowl job you would rather not lift; a fixture stop that will not close or leaks when turned
Notes
- U.S. EPA WaterSense, "Fix a Leak Week." epa.gov ↩
- Fluidmaster, "400A Fill Valve Installation Instructions." fluidmaster.com ↩