Chapter Seventeen
Taking Off a Trap
By the editors of this book. Sources checked November 2, 2026.
To clean a P-trap, set a bucket under it, loosen the two slip nuts, lift off the curved piece, clear it, and refit it with the washers the same way round. It takes about 20 minutes on an ordinary sink. It is also how you get back a ring that has gone down the drain, as long as you stop running water the moment it goes. Chapter 5 explains what the trap is for, and the job goes better once you know.
17.1 Before you touch it, has anything been poured in?
Ask first, and ask everyone in the house. A trap is where a drain cleaner sits when it has not cleared the clog, and taking it off would pour that liquid onto your hands and arms. National Capital Poison Center warns that caustic products burn on contact with skin and eyes.1 If any chemical has gone down and the drain has not cleared, leave the trap alone, however long ago it was, and go to Chapter 18. Call a plumber, and tell them what the product was.
If the drain has had nothing but ordinary kitchen or bathroom use, carry on.
17.2 What is actually under the sink?
Most sinks have a tubular trap in two or three pieces. A tailpiece comes down from the sink. A curved section, the U-bend, holds the water. A trap arm runs from the bend back to the fitting in the wall. Each joint is a large slip nut squeezing a tapered washer.
Plastic traps are usually tightened by hand, and that is how you should treat them. Chrome traps may be thin brass under the plating, and old ones can crush or split in pliers. If yours is chrome and old, put a rag around the nut and go gently, and have a replacement in mind before you begin.
If you have a trap with a small plug at the bottom, it is tempting to use that instead. Many will drain the water but leave you no room to clean anything, so removing the bend is usually better.
17.3 Taking it off
You need a bucket, rubber gloves, eye protection, large slip-joint pliers, a rag, and an old bottle brush or a bent wire. Figure 17.1 shows the setup. Clear out everything stored under the sink first, because you will be lying there.
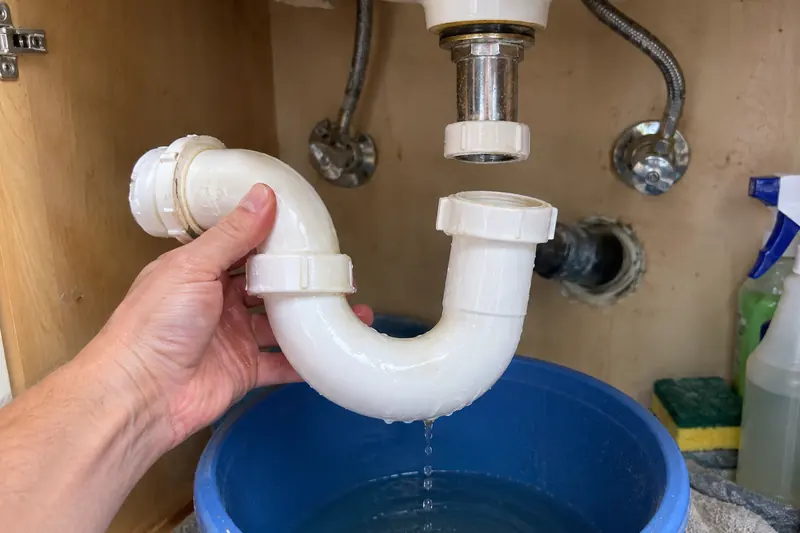
- Stop using the sink, and tell everyone else in the house.
- Set the bucket right under the bend.
- Loosen the slip nut on each side of the bend, by hand if you can, with padded pliers if not.
- Slide the nuts away and pull the bend down, keeping it level until it is over the bucket.
- Tip the water out and check inside the bend for the ring, the hair or the grease.
- Note which way round each washer faces, and take a picture of it on your phone.
- Scrub the bend clean in a bucket of water, not in the sink, which now drains on your feet.
- Look into the trap arm with a flashlight, and clear whatever you can reach.
- Plug the open trap arm with a rag if you are going to be away from it for more than a few minutes.
If the bend is clean and the sink was still slow, the clog is further in. This is the right moment to feed a hand snake into the trap arm, as described in Chapter 16. The fitting in the wall is often much easier to get through than the trap would have been.
17.4 Putting it back without a leak
Slip joints do not need much force. They seal because the washer is pressed against the pipe, and a washer pressed crookedly will leak however tightly you turn the nut.
- Pull out the rag if you used one.
- Check each washer. Replace any that is flat, hard or split.
- Slide the nut and washer back on each pipe, with the tapered side of the washer facing the joint as you found it.
- Fit the bend so the pipes enter the joints straight.
- Tighten both nuts by hand, then a small further turn with pliers on metal if needed.
- Run the water hard for a minute.
- Run a sink of water and pull the stopper, since a full sink tests harder than a tap.
- Lay dry tissue under the joints, and check it after an hour.
No thread compound or tape belongs on these joints unless the maker of the trap calls for it. A slow drip from a slip nut usually means one of two things: the washer is the wrong way round, or the pipes are out of line. Back it off, straighten it, and try again. Do not simply tighten harder.
A new bend or a whole trap kit costs little and fits most sinks, as long as you match the pipe size, which is commonly 1-1/2 inches for a kitchen sink and 1-1/4 for a bathroom sink. Measure yours. Replacement traps are listed in PlumbingSupplyAndMore's traps section (PlumbingSupplyAndMore has the same owners as this book), which is one place to look, not the only one.
17.5 How much water should a trap hold?
Enough to keep drain air out, and not so much that the trap is slow to clear. The federal standard for manufactured homes offers one set of numbers: a water seal of not less than 2 inches and not more than 4 inches, with all traps vented.2 That is the manufactured-home rule, given here as an example only. Your own local code sets its own numbers, and a stock trap from any plumbing counter is already made with this in mind.
The same reasoning tells you why you run water when the job is done. Wisconsin's health department tells homeowners to run water into floor and sink drains so that the traps do not dry out.3 A trap you have just emptied has no seal at all until you do.
17.6 When is it more than a trap?
Some installations are simply wrong, and you may spot one while you are down there. A trap with no arm running back into the wall, one that drops straight through the floor in an S shape, or one with a flexible ribbed pipe in place of a bend are the usual ones. So is a sink whose trap arm runs uphill toward the wall. These can siphon the trap dry or collect debris, and they are worth mentioning to a plumber.
Likewise, a wall fitting that has rotted or a trap arm that no longer lines up with it is past what a bucket and pliers can do. The pipe in the wall is the house's drain system, which is Chapter 4, and work there may need a permit depending on your town.
Where the line falls
- Yours to do
- Removing and cleaning a tubular trap; changing washers and slip nuts; replacing a trap or bend of the same size; getting back a dropped ring
- For a licensed pro
- Any trap holding drain chemical; a corroded or broken wall fitting; re-routing a trap arm or fixing an S-shaped trap; a trap that keeps siphoning dry
Notes
- National Capital Poison Center, "Caution with Caustics." poison.org ↩
- Legal Information Institute, Cornell Law School, "24 CFR 3280.606, Traps and cleanouts." law.cornell.edu ↩
- Wisconsin Department of Health Services, "Sewer Gas." dhs.wisconsin.gov ↩